If you build machines for industries like plastic injection molding, CNC press brakes, baling presses, or steel rolling, you know how much precision and repeatability matter. Installing a hydraulic servo control system helps you meet these needs with better reliability and control.
This guide shows you how to build a system like this, from picking the right parts to checking how well it works. We’ve broken it down step-by-step just for makers in North America and Canada who work with top-notch hydraulic gear.
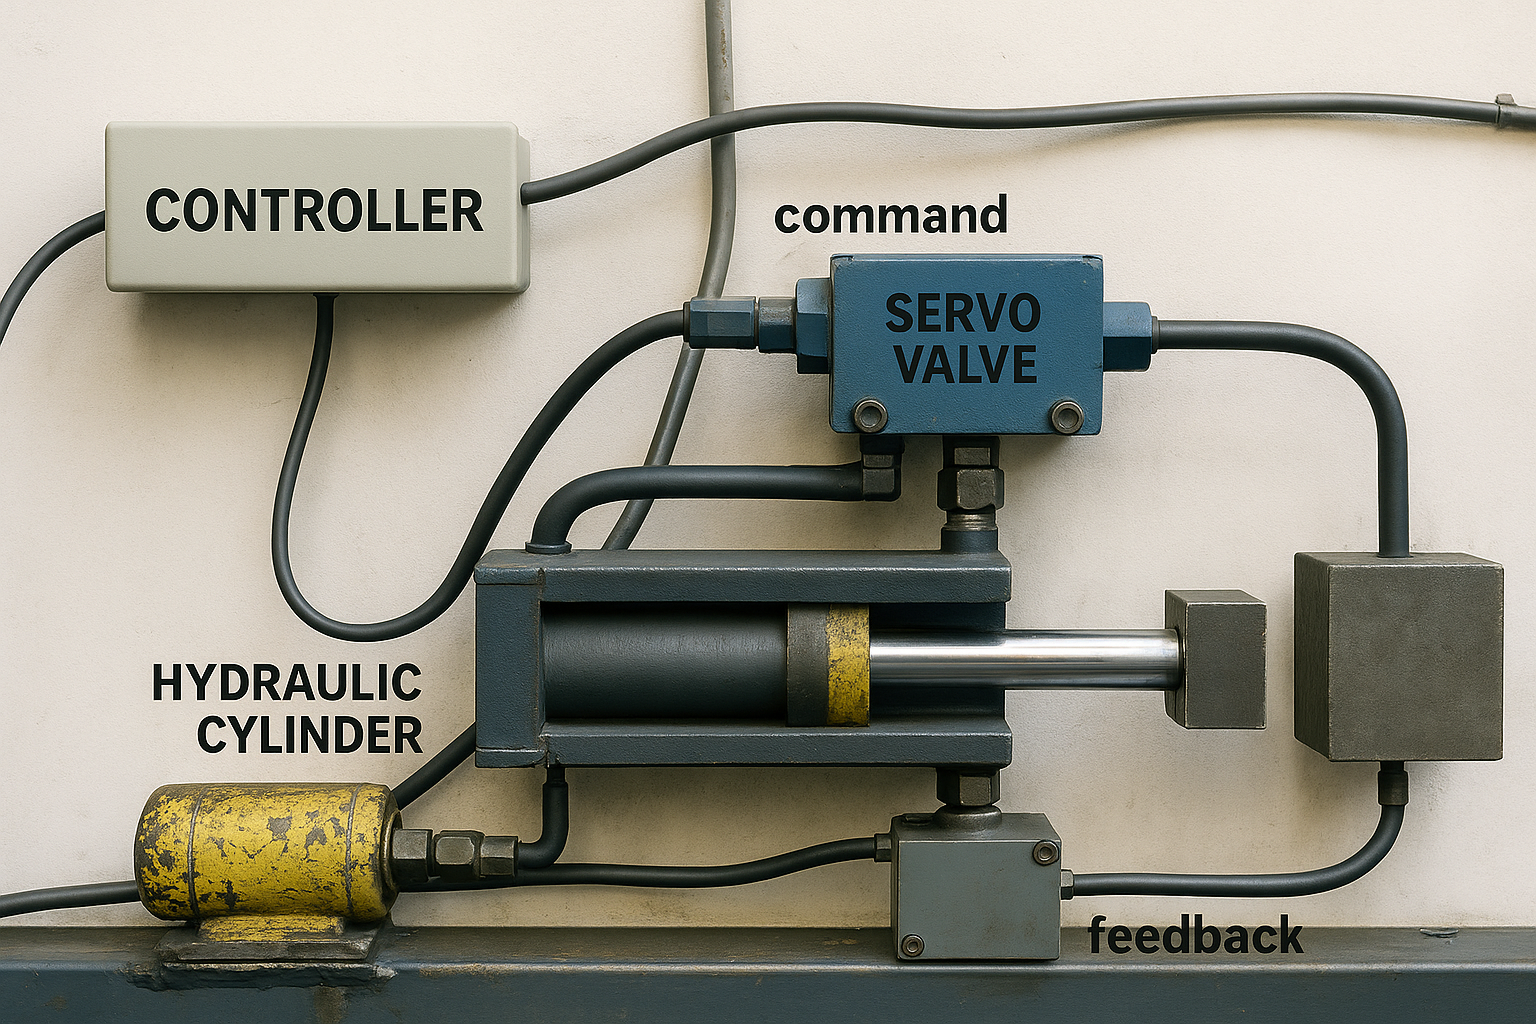
Why Servo Hydraulic Systems Matter
Old-school hydraulic setups can make it hard to control position or speed. The system often reacts or gets thrown off when the load changes.
A hydraulic servo control system fixes this issue. It uses a closed-loop circuit that keeps getting feedback to tweak the flow and pressure on the fly. This gives you:
- Better motion control
- Higher productivity
- The same results every time you make something
These advantages have a strong impact on machines like injection molding, blow molding, and press forming systems.
Step 1: Know What Your Application Needs
Before picking any equipment, figure out what your machine must do to work well.
Think about these key things:
- Is the load always the same, or does it change?
- How much control do you need over speed, position, and force?
- How fast should the system react?
Take a servo injection molding machine as an example. It needs to change pressure. On the other hand, a steel rolling press might care more about moving and applying a lot of force.
Step 2: Pick the Right Servo Valve
The servo valve plays a crucial role in the system. It has an impact on fluid flow control with great precision based on the input signal.
When picking one, consider:
- Rated flow and pressure
- Valve response time
- Type of actuation (electromechanical or electrohydraulic)
High-response servo valves work well for quick-cycle tasks like plastic molding or CNC punching. For slower, high-force jobs such as baling presses, pay more attention to torque and pressure handling.
You can check out servo valve options from THM Huade that suit different industrial uses.
Step 3: Choose the Hydraulic Actuator or Motor
This component influences turning hydraulic energy into mechanical motion. Based on your machine, pick from:
- Linear actuators (for presses, brakes)
- Rotary actuators or hydraulic motors (to rotate things like screw drives)
Make sure the actuator can handle the stroke length, load weight, and duty cycle your equipment needs. Pair the actuator dynamics with your servo valve’s response to control things more.
Step 4: Put in a High-Precision Feedback Sensor
Sensors measure things like position, pressure, or velocity. Their accuracy plays a key role in a closed-loop control system.
Common sensors include:
- LVDTs to sense position
- Pressure transducers to get real-time force data
- Encoders to control motors
Take a CNC press brake as an example. Sensors keep track of how the ram moves to make sure the bending angles are spot-on. The controller can tweak movements right away based on what it hears back.
Step 5: Set Up the Hydraulic Control Unit
The hydraulic control unit is the core of your system. It has the pump, reservoir, filters, and valves.
Make sure your unit gives you:
- Clean, filtered hydraulic oil
- A big enough reservoir
- Ways to keep the temperature steady
Go for servo pumps to improve energy efficiency. They adjust flow based on current needs, making them great for molding and steel processing machines.
Step 6: Set Up the Electronic Controller
The “brain” of your system is the electronic controller or drive. It processes feedback from sensors and sends commands to the servo valve.
What you should look for in a controller:
- It works with your machine’s PLC or CNC system
- It processes signals
- It has an easy-to-use interface for setting parameters
Pick a controller that supports common communication protocols like CANopen, Modbus, or EtherCAT to make integration easier.
Step 7: Perform Initial Calibration and Testing
After installation, calibrate each part:
- Set zero points for sensors
- Check how valves respond
- Run test cycles at low loads
Make sure system pressure matches what’s on the design and check that there’s no shaking or weird sounds when it’s running.
In a servo injection molding machine, try different cycle speeds to see how well the system keeps pressure and fills the mold.
Step 8: Program Operating Sequences
After you finish testing, you can program operation sequences into your controller. Use this step to:
- Define start/stop cycles
- Set pressure and speed ramps
- Enable emergency stops and safety limits
This matters a lot in CNC machines where you need to time and control tool movement for the best results.
Step 9: Monitor System Performance in Real-Time
Real-time monitoring boosts uptime and cuts down wear. Most servo systems show digital displays or dashboards that display:
- How valves respond
- What sensors read
- Temperature and pressure of the fluid
Create alerts for when performance strays from what you expect. If a hydraulic motor in a baling press works outside its torque range, the system can warn maintenance before it breaks down.
Step 10: Plan for Maintenance and Service
Even with exact control, hydraulic systems need regular checks. Keep an eye on:
- How clean the fluid is
- How much have the valves and actuators worn
- If sensors are calibrated correctly
Plan preventive maintenance based on how much the system is used. This stops surprise downtime in continuous production environments like steel and cement plants.
Benefits You Can Expect
When you set up a hydraulic servo control system the right way, you’ll see:
- Quicker cycle times
- More consistent parts
- Less energy use
- Less noise
- Parts that last longer
Servo hydraulics give your machines the accuracy and steadiness they need, whether you work in plastic molding, metal forming, or industrial automation.
Real Industry Applications
Here’s where you’ll commonly find hydraulic servo control systems:
| Industry | Application |
| Plastic Manufacturing | Servo injection and blow molding machines |
| Sheet Metal Fabrication | CNC press brakes, punching machines |
| Waste Management | Hydraulic baling presses |
| Steel Production | Rolling and forming machines |
| Construction Equipment | Excavators, concrete pumps |
Each of these benefits comes from the precise force and speed control only servo hydraulics can offer.
Want to Construct or Enhance Your System?
When you design a new machine or upgrade an old one, picking the right servo parts is key. Check out THM Huade’s servo system page to find parts that fit your needs.
We build our systems for heavy-duty use and test them for industrial dependability. Do you need help choosing or setting up? Get in touch with us through our contact page.
Putting in a servo hydraulic system means investing in accuracy, dependability, and manufacturing that’s ready for the future. When your machines do better, your business does better, too.
FAQs
How much time does it take to set up?
It can take anywhere from a single day to several weeks, based on how complex it is. Good planning and checks beforehand help speed things up.
Which industries get the most out of servo-hydraulic systems?
Plastic molding, sheet metal, and heavy equipment makers see the biggest improvements in accuracy.
Do these systems reduce energy consumption?
Yes. Servo pumps adjust to match the load required, resulting in significantly lower power consumption compared to regular pumps.